3. Setting up Windows Deployment Services for Server 2008
For Windows Server 2008 WDS is provided as a
role you may add and is much more straightforward than the steps
previously discussed for handling a Windows Server 2003 installation.
The steps to perform this installation on Server 2008 are provided
below:
Launch Server Manager, navigate to Server Manager =>
Roles, and choose Add Roles from under Roles Summary.
From
the second screen in the Add Roles Wizard (the first may be optionally
disabled from appearing), select Windows Deployment Services from the
list of available roles and click Next.
NOTE
You can also initiate the installation from the command line:
ServerManagerCmd -install WDS
The first window of the Add Roles
Wizard dedicated to the installation of WDS starts with an introduction
to Windows Deployment Services with links to more information. Click
the Next button to continue.
Select Role Services.
Both are selected by default. You can choose to install only Transport
Server if you want to leverage multicasting without utilizing WDS, but
choosing Deployment Server requires Transport Server as a dependency.
Leave both services selected and click Next.
A confirmation page is provided to confirm your desire to install
Windows Deployment Server with the Deployment Server and Transport
Server services.
Click the Install button to begin the installation. A page showing the results of the installation is presented.
Click the Close button to exit the Add Roles Wizard.
After installation is complete, the next step is to configure Windows Deployment Services.
4. Configuring Windows Deployment Services
This section highlights some potential
configuration issues and then covers the use of the Windows Deployment
Services Configuration Wizard to establish a basic configuration and
progresses through providing images and finally configuring the Boot
Menu.
Understanding potential WDS configuration issues
There are a handful of issues you should be aware of when configuring WDS. The following list describes these known issues:
Use Windows Server 2008 media for your
boot image. You should use the Windows Server 2008 media without
modification for best results. You can use the Boot.wim from
Windows Vista media if it includes SP1. However, you need to obtain the
media with SP1 already included because it cannot be slipstreamed.
IPv6 is not supported.
If
you are running WDS on a network with a non-Microsoft DHCP server, you
will need to configure the server to not listen on port 67, and you'll
need to configure DHCP to add Option 60 to your DHCP scopes.
If
DHCP is installed on a server on a different subnet, you must configure
IP Helper tables. DHCP traffic is not normally forwarded to other
networks, but to support use of PXE across subnets you should configure
UDP port 67 to be forwarded directly to both the DHCP server and the
Windows Deployment Services PXE server. Additionally, all traffic on UDP
port 4011 from the client computers to the PXE server should be
properly routed.
NOTE
Alternatively, you can add DHCP options 66 and 67. Option 66 must be set to the WDS server and option 67 should be set to boot\x86\wdsnbp.com.
Running the Windows Deployment Services Configuration Wizard
Like so many setups and installations, a helpful
wizard walks you through the configuration options available to
configure WDS. To configure WDS, perform the following steps:
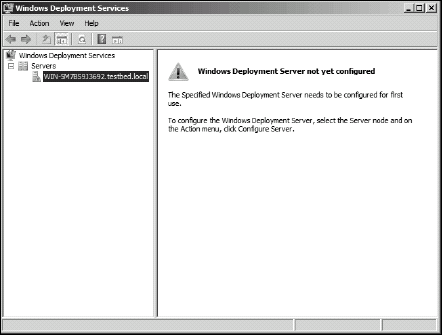
As a member of the Domain Administrators group, launch Windows Deployment Services from Administrative Tools.
Expand
the list of servers on the left, and the unconfigured server will be
listed with a yellow caution sign in its icon indicating it is in an
unconfigured state (see
Figure 3).
Right-click the server and choose Configure Server.
Click Next.
The next page of the wizard prompts for the Remote Installation Folder
Location where you may specify the path and folder name for the remote
installation folder. This folder contains the OS images. Make sure you
choose a location with plenty of space. Unlike RIS you do not need to
specify a volume that acts as a single instance store, as the WIM files
themselves actually provide this functionality. The default path is
C:\RemoteInstall. However, the C drive is normally the Windows system
volume, and it is recommended that you choose a different volume (or
even a different disk if possible).
Change the default if desired and then click the Next.
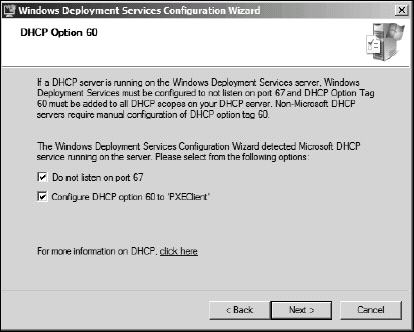
The next step in the wizard is for handling DHCP option 60. If DHCP is
running on the WDS server, it must be configured not to listen on port
67, and DHCP option 60 must be added to all DHCP scopes on the server.
If you are not running a Microsoft DHCP server, you will have to
configure it manually, but with Microsoft DHCP server, the wizard will
detect and offer the appropriate options to be checked (see Figure 4).
Next you are prompted to
specify the PXE Server Initial Settings. PXE client computers can be
pre-staged in Active Directory Domain Services, and doing so designates
them as known client computers. Whereas not pre-staging clients designates them as unknown client computers. This page allows you to specify how PXE should respond to known and unknown clients based on your own preferences.
Choose your desired setting and click the Finish button to commit your configuration choices.
A Configuration Complete screen is displayed with the option to Add
images to the Windows Deployment Server now check box (checked by
default).
Deselect the Add images to the Windows Deployment Server now check box and click Finish to close the Wizard.
Adding the default boot image
A boot image is an image containing Windows PE
that the client boots into to select the image they want to install.
When you have multiple images available, you may want to customize the
boot image menu (this is covered later in this section). Aside from
adding a default Install image (covered below), you cannot make use of
WDS without first providing a default boot image. To provide the default
boot image, perform the following steps:
From within the Windows Deployment Services MMC, navigate to Windows Deployment Services =>
Servers =>
<your server>, right-click Boot Images, and choose Add Boot Image to launch the WDS Add Image Wizard.
Use the Browse button to select the location of the
boot.wim
file you want to provide. Normally this will be the boot.wim
from the sources folder on the Windows Server 2008 DVD (or DVD image).
Remember, if you want to use a Windows Vista boot.wim you'll need to get
it from a Windows Vista with Service Pack 1 DVD (where service pack one
is included in the installation media on the DVD). When you have
selected the boot.wim file, click Next to continue.
Next, you may modify the name and description of the image (pulled from the installation media).
For example, it may read "Microsoft Windows Longhorn Setup (x86)" and
you can change this to "Windows Server Setup (x86)". Particularly if you
are working in an environment with multiple architectures it is a good
idea to include the architecture in the title as shown here.
Make any desired changes and click Next to continue. A Summary page is provided to provide a quick review of your choices.
Click Next to have the boot image added to WDS. A progress bar and messages appears until the copy process is complete.
Click the Finish button to close the WDS Add Image Wizard.
Adding the default Install image
A boot image is one requirement for using WDS
and the other is to add an Install image. To add an Install image,
follow the below steps:
From within the Windows Deployment Services MMC, navigate to Windows Deployment Services =>
Servers =>
<your server>, right-click Install Images and choose Add Install Image to launch the WDS Add Image Wizard.
Create
a new image group option to specify a name such as "Test Images,"
"Vista Images," "Server Images," and so on and then press the Next
button to continue. This Image Group window lets you select an
existing group or create a new group. Groups are used to collect similar
images for purposes of organization. Because this is the first time you
are adding an Install image, you will have to use the Create a new
image group option and specify a name for the new group.
Enter the path to Windows Image (WIM) file that contains the image (or images) you wish to add and click Next to continue. You may click Browse
to select an image such as the default Windows Server 2008 image, which
may be found at D:\sources\install.wim (assuming your DVD drive is D).
On the List of Available Images page, leave the box selected to use the default names and press the Next button to continue.
By default, all are checked but select only those you wish to add to
WDS. At the bottom of the display is a check box to Use default name and
description for each of the selected images. If you deselect this box,
the next pages of the wizard request a desired name and description for
each selected image being added. This may be desirable in cases where a
meaningful name was not provided, or in the case of Windows Server 2008,
where the name and description may refer to Windows Server 2008 as
Windows Longhorn.
Review the Summary presented, and click Next.
This Summary page is provided to confirm the group name, image file
path and filename, as well as a list of all the image names to be added
from that file. You can use the Back button to make any desired changes.
At this point, the Task Progress window is displayed during the process
of adding the images where integrity of the source-install image file
is performed before adding the image. A progress bar and status message
are provided as this process can potentially take some time to complete.
When the operation is complete, the Finish button will enable and you can use this to exit the wizard.
Configuring the boot menu
When a system boots to a boot image it loads
Windows PE and then presents a menu to the user so they may select which
image they wish to install. When there is more than one boot image,
clients will be presented a menu to choose the boot image to be used.
Once the user selects a boot image, it will load and display the
available Install images. When customizing boot images, it is often the
case that you may have different boot images for different tasks (such
as architecture type). You may configure a boot image for the following
reasons:
Start setup to install Windows Vista.
Load a Windows PE image for use by administrators (such as yourself).
Provide the Windows Recovery Environment (Windows RE).
Reformat the hard drive to support BitLocker Drive Encryption.
A second instance of any of the above to handle 64-bit systems.
You should also be aware of the following known issues and limitations:
You can use only 13 boot images per menu:
The number of characters that can be displayed within the Boot Menu
necessitates this limitation. Thirteen boot images is quite a lot and
you will likely not approach this limitation.
The name of the specified image file cannot contain any spaces: Only numbers and letters are supported in WIM image names here.
Use the Boot.wim from the Windows Server 2008 media:
As mentioned earlier, you must use the boot.wim from the Windows Server
2008 media or from the media of a Windows Vista Service Pack 1 image
(using the boot.wim from Windows Vista media prior to inclusion of
Service Pack 1 will result in multicast issues).
To configure the boot menu, first you need to add an additional boot image. To do so, follow the steps below:
From within the Windows Deployment Services MMC, navigate to Windows Deployment Services =>
Servers =>
<your server>, right-click Boot Images and choose Add Boot Image to launch the WDS Add Image Wizard.
Use
the Browse button to select the location of another boot.wim file such
as one for a different architecture. When you have selected the
boot.wim
file, click Next to continue.
Make any desired changes and click Next to continue..
Particularly if you are adding an image with a different architecture
it is a good idea to include the architecture in the title which will
appear in the boot image menu.
Click Next on the Summary page to have the boot image added to WDS. A progress bar and messages will appear until the copy process is complete.
Click the Finish button to close the WDS Add Image Wizard.
NOTE
It is also possible to add additional boot images from the command prompt by using the WDSUtil command line as follows:
WDSUTIL /Add-Image /ImageFile:c:\temp\MyBoot.wim /
   ImageType:boot
For ImageFile, you would naturally specify the path and filename of whatever boot image it was you were working to have added.
Customizing the Boot Menu with BCDEdit
Now that you have two images, the Boot Menu will
automatically be updated to include both images based upon the
information you provided in the steps above. None of the steps in this
section need to be configured for many environments. However, to
customize the Boot Menu further, you may use the BCDEdit.exe command line tool to edit the default.bcd file (located at %REMINST%\boot\<architecture>\Default.BCD). Some common commands are detailed here including:
View the Contents of the BCD Store
Configure the Default Selection Time-out Value
Set the Desired Default Selection
Configure the TFTP Block Size
Configure the TFTP Window Size
NOTE
It is always a good idea to back up the BCD Store before modifying it.
The command below will create a backup to the specified path (W:\BCDRecover):
bcdedit /export "w:\bcdrecover\bcd"
The command below will restore the above backup:
bcdedit /import "w:\bcdrecover\bcd"
An alternative to the BCDEdit utility is offered
by a third party in the form of VistaBootPro. This tool aims to provide
a more user-friendly GUI experience for customizing your boot
configuration (see Figure 5).

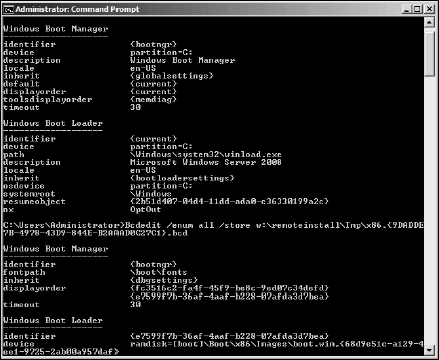
Viewing the contents of the BCD store
The BCD store dictates the behavior of the boot
process. Key to making any changes is first knowing what is included and
what the current settings are. This may be accomplished with the
following BCDedit command line (the output of which is shown in Figure 6):
Bcdedit /enum all /store w:\remoteinstall\Tmp\x86.{9DADDE7B-4978-
   43D9-844E-B2AAAD0C27C1}.bcd
Configuring the default selection timeout value
The default timeout value for the Boot Menu is
30 seconds. In the older (more simple) days you might have made this
change by editing the boot.ini file. Today, the BCD store replaces the boot.ini
file even for the local system boot process so the steps are actually
identical for each if you should want to adjust this for your Windows
Vista or Server 2008 computers locally:
View the existing configuration settings in the Default.bcd store by running the following command:
bcdedit /enum all /store w:\RemoteInstall\Boot\x86\default.bcd
When you view this, you should see two Windows Boot
Loader sections with descriptions matching that of the two boot images
you added to WDS.
Set the timeout for the default BCD store to ten seconds by running the following command:
bcdedit /store w:\RemoteInstall\Boot\x86\default.bcd /set
   {bootmgr} timeout 10
Force regeneration of the BCD store in the \Tmp folder by sending a control signal to the WDSServer service. You may do so by running the following command:
sc control wdsserver 129
Setting the desired default selection
After the default timeout value expires the
default item will be chosen. If you have multiple items, you may specify
the default item by following these steps:
Determine
the GUID of the boot loader you wish to specify as default by running
the following using bcdedit with the /enum switch as shown below:
bcdedit /enum all /store w:\RemoteInstall\Boot\x86\default.bcd
Use the determined GUID value with the default switch to specify your desired default Boot Menu item:
bcdedit /default {68d9e51c-a129-4ee1-9725-2ab00a957daf}
Configuring the TFTP block size
The default TFTP block size value is 1432 bytes.
Some networking equipment, such as cryptographic devices, can add
overhead that makes it necessary to reduce this default. Although larger
packets run a higher risk of being fragmented at the IP level,
increasing the block size improves the transfer performance while
allowing larger files to be transferred. You can configure this value by
setting the appropriate value in the default BCD store by performing
the following actions:
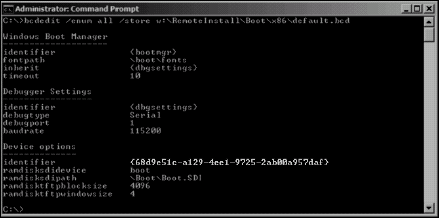
Determine the GUID identifier of the boot manager application by running the following using
bcdedit
with the
/enum
switch as shown. The GUID you should be looking for is shown in Figure 7:
bcdedit /enum all /store w:\RemoteInstall\Boot\x86\default.bcd
Set the appropriate TFTP block size value by running the following command:
bcdedit /store w:\RemoteInstall\boot\x86\default.bcd /set
   {68d9e51c-a129-4ee1-9725-2ab00a957daf} ramdisktftpblocksize
   4096
NOTE
It is recommend that you go up in
multiples (4096, 8192, and so forth) and also that you not set a value
higher than 16384. It is also important to consider that the configured
block size applies to all clients. You should set this value only as
high as the block size upper limit that all the clients on the network
support.
Finally,
it is necessary to force regeneration of the BCD store in the \Tmp
folder by sending a control signal to the WDSServer service. You may do so by running the following command:
sc control wdsserver 129
Configuring the TFTP window size
TFTP is an inherently slow protocol because it
requires an acknowledgment (ACK) packet for each block of data that is
sent. Because the server will not send the next block in the sequence
until the ACK packet for the previous block is received, the round-trip
time can be very long on a slow network. You can optimize this by
manipulating the TFTP size. TFTP windowing enables you to define how
many data blocks it takes to fill a window. Data blocks are sent back to
back with no ACK packets until the window is filled and then an ACK
packet is sent. The result is fewer ACK packets and faster download
times for the client. The default TFTP window size is 8. To change this
value, perform the following actions:
Determine
the GUID identifier of the boot manager application by running the
following using bcdedit with the /enum switch as shown below.
bcdedit /enum all /store w:\RemoteInstall\Boot\x86\default.bcd
Set the appropriate TFTP window size value by running the following command:
bcdedit /store w:\RemoteInstall\boot\x86\default.bcd {68d9e51c-
   a129-4ee1-9725-2ab00a957daf} ramdisktftpwindowsize 9
Finally,
it is necessary to force regeneration of the BCD store in the \Tmp
folder by sending a control signal to the WDSServer service. You may do so by running the following command:
sc control wdsserver 129